

I found that when rigging characters and props, one thing that always impressed me in demo reels and in interactive scenarios is the use of real time dynamics in the Maya viewport. A lot of possibilities open up when you can grab a control rig and drive a simulation with your mouse in real time! I noticed that in Motion Builder, this kind of simulation comes with the sample rigs for free and I always wanted to try to figure out a way to get real time secondary motion in Maya for things like hair, cloth, and other loose items.
I found a way to achieve this a while back and I've always wanted to make a tutorial for everyone to follow to do the same thing. The main issue of course is that there are a good amount of steps to make one simulation driven joint chain so naturally, you would want to script this out. This tutorial will go over how to create the rig in Maya and it will also go over how to script this process out in python so that you can simply select the base of a joint chain and automatically make it dynamic.
Hit the jump for the entire tutorial:
The effect itself is pretty simple and can also be scaled out to more complex rigs. The idea is that once the rig is finished, you can add joints to the rig that align with any loose articles and run this script against them to make them all dynamic. This tutorial won't go over any specific scenarios but instead it will just cover the basics so that you can take it and modify however you like.
( WARNING: THIS TUTORIAL IS FOR MAYA 2014. I WILL TRY TO LEAVE NOTES ON WHAT YOU NEED TO DO IN PREVIOUS VERSIONS OF MAYA TO GET THE SAME EFFECT )
The first thing that you will need is a joint chain to work with.
STEP 1:
In Maya, create a new scene and create a simple joint chain:
In the Animation tab, Go to Skeleton > Joint Tool and create a few joints in the viewport:


With a joint created for us make dynamic, we now want to create a curve that will ultimately drive the behavior of the joint. To do this, we will need a cv curve that whose cvs will align with our joints.
STEP 2:
Create a new cv curve and place each cv along each joint:Go to Create > CV CurveTool. Hold the "V" key and click on each joint on your chain from the base to the tip. This will snap each new cv to its respective joint:
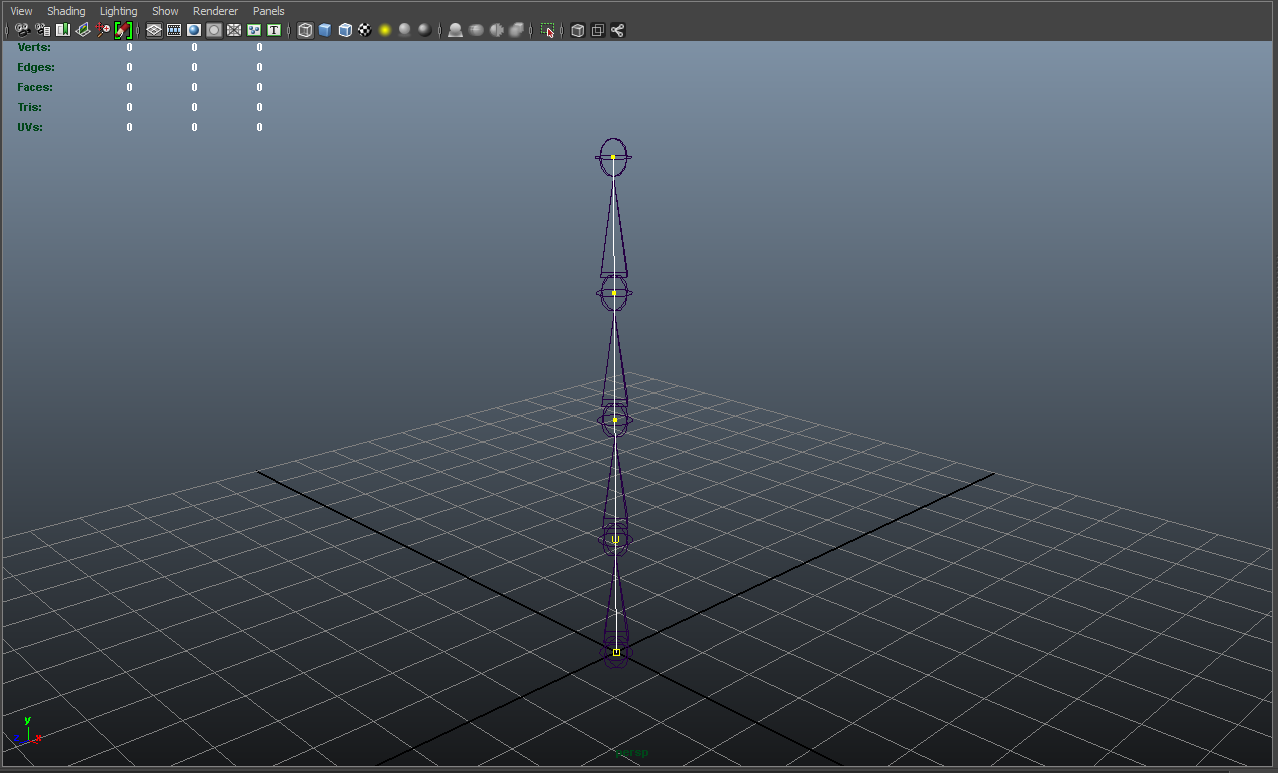
You should now see a curve that looks like this. the More cvs you create for your curve, the more complex your dynamic effect will be. Too many curves can overly dampen the effect and give you extreme results that you may not want so be cautious about the amount of cvs that you make for your curve.
This step can also be automated with a simple script. You'll want to automate as much of this as possible especially if you run into issue along the line and need to restart.
Notice that after you create the curve, if you look in the script editor, you can see the mel command that was run to generate the curve:
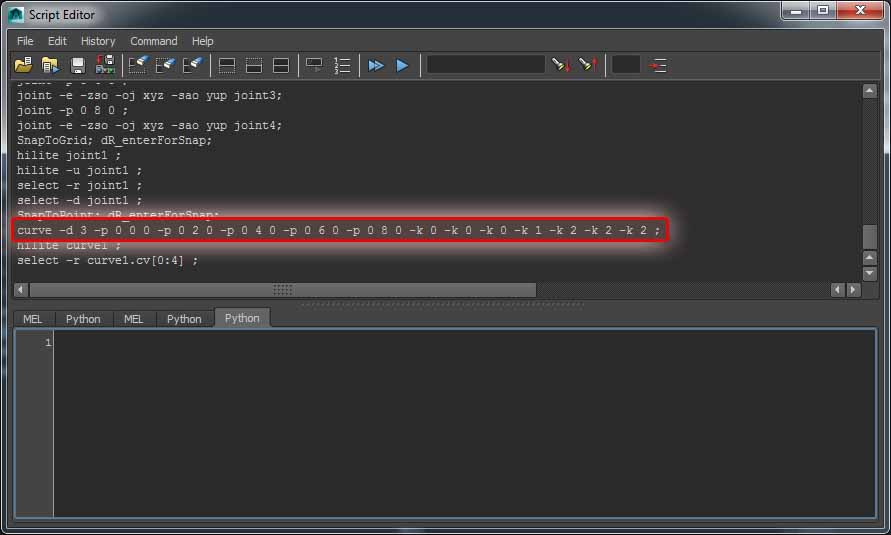
the mel command is the curve command. We'll want to use the python version of this command which is incidentally the same command. In Maya, the Python and Mel commands are typically the same. The key to this command when generating curves is using the "point" or "p" flag. You can add as many points as you'd like with this flag and assign where in world space they get created. We can gather this information from our joint chain and procedurally generate the curve based on the joint chain.
STEP 2 (SCRIPTING):
Select the base joint in your joint chain and run the following script under a Python window in your script editor:# Before running anything in Python, you have to import the maya cmds module.
import maya.cmds as cmds
# Selects every joint in the hierarchy from the joint that was selected.
cmds.select(hierarchy=True)
# Stores every selected joint into memory.
jointChain = cmds.ls(selection=True)
jointPositions = []
# For each joint selected, query its world space position as a tuple and append to a list.
for joints in jointChain:
pos = cmds.xform(joints, q=True, ws=True, t=True)
jointPositions.append(tuple(pos))
# Creates a curve with a cv located along each joint from generated list.
cmds.curve(p=jointPositions)

(The script should look something like this when you run it)
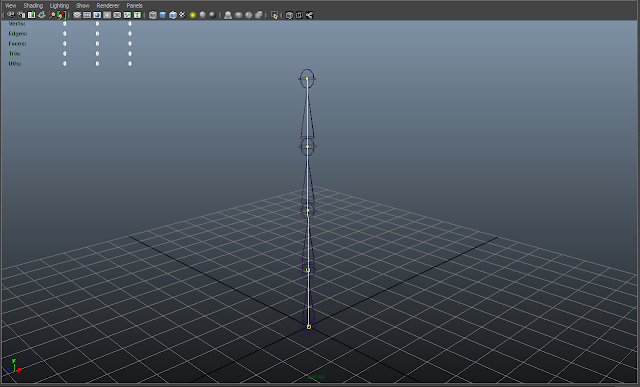


You should now see a curve identical to the one you made by hand along the joint chain:

The next step is to take the curve that you generated and make it dynamic. With Maya, this is pretty straightforward. You can leverage Maya's follicle system to create dynamic curves. This makes this effect ideal for things like hair, tails, cloth, etc.
(Note that in previous versions of Maya, the Hair system does not live in the nDynamics tab yet. You would have to use the Dynamics tab and go to Hair > Make Selected Curves Dynamic on a selected curve to make it dynamic.)
STEP 3:
Select the curve that you created and make it dynamic:
In the nDynamics tab, with your curve selected, Go to nHair > Make Selected Curves Dynamic.

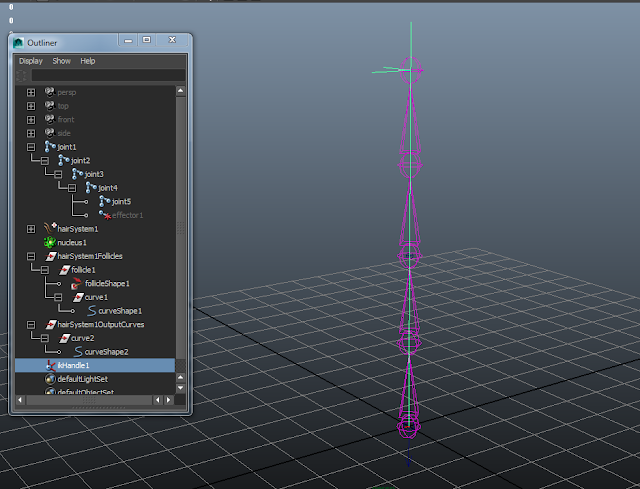
You can see in the outliner that a bunch of new nodes get create. These are all instrumental nodes to setting up dynamic constraints on the curve. Note that in Maya 2014, a nucleus node gets created. The nucleus node in Maya is now a big part of what drives the dynamics of the curve. In previous versions of Maya, this node does get created and so you will have to work with the hairSystemShape instead.
While nothing quite happened yet, the curveShape1 node that was created is not fully dynamic. You can key and and watch it simulate during playback. We're more interested in using that curve to drive our joint chain and ultimately our skinned model. To get the curve attached to the joint chain, we're going to use an IK Spline handle. IK Spline handles allow you to drive joints purely from a curve.
STEP 4:
Create an IK Spline handle, using the joint chain and dynamic curve that you created:
In the Animation tab, Go to Skeleton > IK Spline Handle Tool (Option Box).

In the Tool Settings that popped up, Uncheck Auto parent curve and Auto create curve.

In the Outliner, Shift select your base joint, followed by your end joint and your curve shape (curveShape2) in the "hairSystem1OutputCurves" group.

You should now have a spline IK handle driving your joint chain.

Now that we've gotten this far, let's back track a little and start automating the past two steps so that we can procedurally get back to this point by selecting a clean joint hierarchy and running our script. Please read the notes carefully as you work with this script so that you can see how to write out what we did in Python.
STEPS 3 AND 4 (SCRIPTING):
Delete everything in your scene except your joints. Select the base joint in your joint chain and run the following script under a Python window in your script editor:
'''
Now that we've gotten a few more steps in place to create our dynamic curve, We
want to start organizing our code a little bit more to make is scalable. This allows
us to write code that we can call for our current and possible for future needs.
'''

import maya.cmds as cmds
# Unfortunately there are no python commands to make curves dynamic.
# In order to use the makeCurvesDynamic mel command, we'll need to import maya.mel
import maya.mel as mel


# We'll start by creating a class that we can store useful functions in to call later.
class AutoOverlap:
    '''
    This class will store the functions that we'll need to create our auto overlap joint chain.
    '''
    def __init__(self):
        '''
        This is our constructor. We can use it to take in arguments or run code once the class
        is called. We may use this later.
        '''

    def createCurveFromJoints(self, jointChain):
        '''
        Takes in an array of joints and generates a curve that aligns with the input joints
        '''
        jointPositions = []

        # For each joint selected, query its world space position as a tuple and append to a list.
        for joints in jointChain:
            pos = cmds.xform(joints, q=True, ws=True, t=True)
            jointPositions.append(tuple(pos))

        # Creates a curve with a cv located along each joint from generated list.
        newCurve = cmds.curve(ep=jointPositions)

        # Returns resulting curve so that it can be called later.
        return newCurve

    def makeCurveDynamic(self, curve):
        '''
        Takes in curve and makes it dynamic
        '''

        # Store the string mel command in a variable
        makeCurvesDynamic = 'makeCurvesDynamic 2 { "1", "0", "1", "1", "0"};'

        # Select a curve
        cmds.select(curve)

        # Use maya.mel.eval to run the mel command through python
        mel.eval(makeCurvesDynamic)


# This will be where our script begins.
# We will leave this part of the script out of the class since we can define our chain in other ways.
cmds.select(hierarchy=True)
joints = cmds.ls(selection=True)

# If we want to use our class, we need to create an instance of the class.
ao = AutoOverlap()

# We can now call our createCurve method to generate our curve
generatedCurve = ao.createCurveFromJoints(joints)

# Make our generated curve dynamic
ao.makeCurveDynamic(generatedCurve)

# Create spline IK handle from a base joint, an end joint, and a curve.
# We're going to temporarily hard code the curve input and make it data driven later.
# For the base and end joint, we will use the first index of our joint selection and last index of our joint selection.
# MEL command reference: ikHandle -sol ikSplineSolver -ccv false -pcv false -ns 4;
aoIkSplineHandle = cmds.ikHandle(sj=joints[0], ee=joints[-1], sol='ikSplineSolver', c='curve2', ccv=False, p=2, w=.5)
Here is where things get exciting! Now you have a dynamic joint that's driving your joint hierarchy. You can actually interact with the dynamics using the interactive playback feature in Maya. Ultimately we'll want to make this interactive without a need for playback but this is a good place to start testing your simulation.
Let's try playing with our simulation.
STEP 5:
Run your simulation through Interactive Playback and tune the simulation to get nice results:
Set your timeline to a really high number like 1000 frames.

In the Outliner, Select "curve1" under the hairSystem1Follicles group.

(While the curve is selected) In the Dynamics tab, Go to Solvers > Interactive Playback. Move the curve around in space and observe the effect.
You should see an effect like this.

While this is a good effect. We don't want the ends of the curve locked at both ends. We want the end joints to move freely. To do this, we need to grab the follicleShape node and change the Point Lock attribute to Base.
In the Outliner, Select follicleShape1

In the attribute editor, Switch the Point Lock enum attribute to "Base"

You should see an effect like this.

Now that we're getting the desired effect that we're looking for, we want to set up a control rig that will drive our auto overlap rig.
In the Outliner, Select "curve1" under the hairSystem1Follicles group.

(While the curve is selected) In the Dynamics tab, Go to Solvers > Interactive Playback. Move the curve around in space and observe the effect.
You should see an effect like this.

In the Outliner, Select follicleShape1

In the attribute editor, Switch the Point Lock enum attribute to "Base"

You should see an effect like this.

Now that we're getting the desired effect that we're looking for, we want to set up a control rig that will drive our auto overlap rig.
STEP 6:
Create an expression a control curve with custom attributes for the follicle simulation:
Go to Create > NURBS Primitives > Circle. Make sure that your nurbs circle is snapped to the base joint of your simulation. Name your nurbs circle "baseCtrl".


Select "baseCtrl". Go to Modify > Add Attribute. For Long Name, type in DynamicFollicle. Make sure that Float is checked.

Select "baseCtrl". Go to Modify > Add Attribute. For Long Name, type in AutoOverlap. Make sure that Boolean is checked.

Select "baseCtrl". Go to Modify > Add Attribute. For Long Name, type in StopFollicle. Make sure that Float is checked.

While "baseCtrl" is still selected, Go to the channel box and set the DynamicFollicle attribute to be non-keyable. Lock the Stop Follicle attribute.

Shift select "baseCtrl" and "curve1". In the Animation tab, Go to Constrain > Parent. Make sure that your settings for your parent constraint are at default.
Now that we have a control curve to work with, we can focus on driving the follicle simulation as well as the joint chain with the controller. Notice that when you select the "nucleus1" node that was created with the follicle, there is an attribute called "Current Time". This is the key to driving the follicle simulation. Currently that attribute is connected to time so it is driven by time. This is why we need to use the playback to see the simulation. You can break this connection and replace it with other driving factors like the translation and rotation of a control curve. This can be done with an expression.
STEP 7:
Create an expression that connects the current time attribute of the nucleus node to the translation and rotation of the "baseCtrl" curve:
Select "nucleus1". Right click on the Current Time attribute and Break Connections.
Select "nucleus1". Right click on the Current Time attribute and Break Connections.
Go to Window > Animation Editors > Expression Editor. In the Expression Editor, Go to Select Filter > By Expression Name. For Expression Name, put in "autoOverlap". In the Expression window, type in this code and press Create:
Your expression editor should look like this:

This will not do anything just yet. Now we need to connect the nucleus current time to the hairSystemShape current time.
Select "hairSystemShape1". Right click on the Current Time attribute and Break Connections.
Shift select "nucleus1" and "hairSystemShape1" in that order. Go to Window > General Editors > Connection Editor. Click on currentTime in the Outputs window and then click on currentTime in the Inputs window. (Be sure that at the top of the Outputs window, you see "nucleus1" and at the top of the Inputs window, you see "hairSystemShape1".

Now when you have "baseCtrl.AutoOverlap" Set to on, you can simply grab the controller and move the joint chain around. The best part is that the dynamic curve simulates as you do it with no need for interactive playback. Do not worry though. Interactive playback and regular playback will still be able to drive your simulation automatically if you want to still use those tools.

/* This allows us to turn simulation on and off with the AutoOverlap attribute
   that we created */
if (baseCtrl.AutoOverlap == 1) {

 /* This expression will force the currentTime to skip ahead per tic rather
    than from the timeline */
 nucleus1.currentTime += 1;

 // These attributes will update currentTime
 float $refresh_tx = baseCtrl.translateX;
 float $refresh_ty = baseCtrl.translateY;
 float $refresh_tz = baseCtrl.translateZ;
 float $refresh_rx = baseCtrl.rotateX;
 float $refresh_ry = baseCtrl.rotateY;
 float $refresh_rz = baseCtrl.rotateZ;

} else if (baseCtrl.AutoOverlap == 0) {
 nucleus1.currentTime = baseCtrl.StopFollicle;
}
Your expression editor should look like this:

This will not do anything just yet. Now we need to connect the nucleus current time to the hairSystemShape current time.
Select "hairSystemShape1". Right click on the Current Time attribute and Break Connections.
Shift select "nucleus1" and "hairSystemShape1" in that order. Go to Window > General Editors > Connection Editor. Click on currentTime in the Outputs window and then click on currentTime in the Inputs window. (Be sure that at the top of the Outputs window, you see "nucleus1" and at the top of the Inputs window, you see "hairSystemShape1".


Now that we have our setup working, we want to be able to script the whole thing. These are many steps and would be really cumbersome to do by hand every time. We want our final script to be efficient and as data driven as possible to allow for us to run it on as many joint chains as we want.
STEPS 5 THROUGH 7 (SCRIPTING):
Delete everything in your scene except your joints. Select the base joint in your joint chain and run the following script under a Python window in your script editor:
'''
Our final script needs to handle all of the steps that we went over in an automated and intelligent
way. We want to make sure that this script is scalable so that we can use it on multiple joint
hierarchies. We will also want to do some case handling to make sure that the script that we make
will communicate any type of error to the user to help them properly debug any issues that may occur.
'''

import maya.cmds as cmds


class AutoOverlap:
    '''
    This class contains functionality that can support creating a real-time automatic overlap rig.
    '''
    def __init__(self):
        '''
        Constructor
        '''

    def createCurveFromJoints(self, jointChain):
        '''
        Takes in an array of joints and generates a curve that aligns with the input joints.
        '''
        jointPositions = []

        # For each joint selected, query its world space position as a tuple and append to a list.
        for joints in jointChain:
            # We want to avoid adding CV's to our curve that won't line up with a joint.
            if cmds.objectType( joints, isType='joint' ):
                pos = cmds.xform(joints, q=True, ws=True, t=True)
                jointPositions.append(tuple(pos))
            else:
                raise RuntimeError("Method 'createCurveFromJoints()' expects a joint chain.")

        # Creates a curve with a cv located along each joint from generated list.
        newCurve = cmds.curve(ep=jointPositions)

        newCurve = cmds.rename(newCurve, 'driverCurve_' + jointChain[0])

        return newCurve

    # Due to the fact the make curve dynamic mel command does not give you anything to track,
    # we will want to make the dynamic curve manually. This will allow us to create
    # an instance of any object created so that we can maintain a data driven and scalable system.
    def makeCurveDynamic(self, curve):
        '''
        Takes in curve and makes it dynamic. Returns list of all nodes created in the process.
        '''
        # Get the curve shape from the transform selection.
        curveShape = cmds.listRelatives(curve, shapes=True)[0]

        if cmds.objectType( curveShape, isType='nurbsCurve' ):
            # Create nodes needed for simulation
            outputCurve = cmds.createNode( 'nurbsCurve', n=('outputCurve_' + curve) )
            hairSystem = cmds.createNode( 'hairSystem', n=('hairSystemShape_' + curve) )
            nucleus = cmds.createNode( 'nucleus', n=('nucleus_' + curve) )
            follicle = cmds.createNode( 'follicle', n=('follicleShape_' + curve) )
            cmds.setAttr((follicle + '.restPose'), 1)

            # Connect nodes to set up simulation

            # Rebuild curve
            rebuildCurve1 = cmds.createNode( 'rebuildCurve', n='rebuildCurve1')
            rebuiltCurveOutput = cmds.createNode( 'nurbsCurve', n=( curve + 'rebuiltCurveShape1') )

            # Generate curve output
            cmds.connectAttr((curveShape + '.worldSpace[0]'), (rebuildCurve1 + '.inputCurve'))
            cmds.connectAttr((rebuildCurve1 + '.outputCurve'), (rebuiltCurveOutput + '.create'))

            # Connect curves to follicle
            cmds.connectAttr((curve + '.worldMatrix[0]'), (follicle + '.startPositionMatrix'))
            cmds.connectAttr((rebuiltCurveOutput + '.local'), (follicle + '.startPosition'))

            # Connect follicle to output curve
            cmds.connectAttr((follicle + '.outCurve'), (outputCurve + '.create'))

            # Connect time to hair system and nucleus
            cmds.connectAttr('time1.outTime', (nucleus + '.currentTime'))
            cmds.connectAttr('time1.outTime', (hairSystem + '.currentTime'))

            # Connect hair system and nucleus together
            cmds.connectAttr((hairSystem + '.currentState'), (nucleus + '.inputActive[0]'))
            cmds.connectAttr((hairSystem + '.startState'), (nucleus + '.inputActiveStart[0]'))
            cmds.connectAttr((nucleus + '.outputObjects[0]'), (hairSystem + '.nextState'))
            cmds.connectAttr((nucleus + '.startFrame'), (hairSystem + '.startFrame'))

            # Connect hair system to follicle
            cmds.connectAttr((hairSystem + '.outputHair[0]'), (follicle + '.currentPosition'))
            cmds.connectAttr((follicle + '.outHair'), (hairSystem + '.inputHair[0]'))

            # Return all created objects from simulation.
            return [outputCurve, hairSystem, nucleus, follicle, rebuildCurve1, rebuiltCurveOutput]

        else:
            raise RuntimeError("Method 'makeCurveDynamic()' expects a curve.")

    def createControlCurve(self, jointChain):
        '''
        Creates control curve with necessary attributes for auto overlap rig.
        Returns control curve
        '''
        if cmds.objectType( jointChain[0], isType='joint' ):
            baseCtrlName = 'baseCtrl_' + jointChain[0]

            # Create control curve
            baseControl = cmds.circle( n=baseCtrlName, nr=(1, 0, 0) )

            # Set attributes on control curve
            cmds.addAttr(ln='DynamicFollicle', sn='DynamicFollicle', at='float', h=False)
            cmds.addAttr(ln='AutoOverlap', sn='AutoOverlap', at='bool', k=True, h=False)
            cmds.addAttr(ln='StopFollicle', sn='StopFollicle', at='float', k=True, h=False)

            cmds.setAttr( baseCtrlName + '.StopFollicle', 1, l=True)
            cmds.setAttr( baseCtrlName + '.DynamicFollicle', k=False, cb=True)

            # Snap control curve to base joint and clean up control curve
            baseJointConstraint = cmds.parentConstraint(jointChain[0], baseControl, mo=False)
            cmds.delete(baseJointConstraint)
            cmds.makeIdentity( baseControl, apply=True, t=1, r=1, s=1, n=2 )

            return baseControl[0]

        else:
            raise RuntimeError("Method 'createControlCurve()' expects a joint as the first index.")

    def createAutoOverlapExpression(self, baseCtrl, hairSystem, nucleus):
        '''
        Takes in control curve and nucleus and connects them with expression.
        '''

        # Break time connections from hair system and nucleus
        nucCurrTime = '%s.currentTime' % nucleus
        hairCurrTime = '%s.currentTime' % hairSystem
        cmds.disconnectAttr('time1.outTime', hairCurrTime)
        cmds.disconnectAttr('time1.outTime', nucCurrTime)

        aoExpression = ('if (' + baseCtrl + '.AutoOverlap == 1) { \n'
                        '\t' + nucleus + '.currentTime += 1; \n'
                        '\tfloat $refresh_tx = ' + baseCtrl + '.translateX; \n'
                        '\tfloat $refresh_ty = ' + baseCtrl + '.translateY; \n'
                        '\tfloat $refresh_tz = ' + baseCtrl + '.translateZ; \n'
                        '\tfloat $refresh_rx = ' + baseCtrl + '.rotateX; \n'
                        '\tfloat $refresh_ry = ' + baseCtrl + '.rotateY; \n'
                        '\tfloat $refresh_rz = ' + baseCtrl + '.rotateZ; \n\n'
                        '} else if (' + baseCtrl + '.AutoOverlap == 0) { \n'
                        '\t' + nucleus + '.currentTime = ' + baseCtrl + '.StopFollicle; \n}'
                        )
        # Set up auto overlap expression
        cmds.expression(n = 'AutoOverlap', string = aoExpression)

        # Connect current time of nucleus to current time of hair system
        cmds.connectAttr(nucCurrTime, hairCurrTime)

# We're going to move our core functionality into a helper function.
def createAutoOverlapChain(jointHierarchy):
    '''
    Take in joint hierarchy and applied an automatic follow through rig to it.
    '''

    # Create auto overlap chain from joint hierarchy. If one joint or no joints are selected, stop the script and prompt the user.
    if jointHierarchy and cmds.objectType( jointHierarchy[0], isType='joint' ) and len(joints) > 1:
        ao = AutoOverlap()

        # We can now call our createCurve method to generate our curve.
        generatedCurve = ao.createCurveFromJoints(jointHierarchy)

        # Make our generated curve dynamic.
        dynamicCurveObjects = ao.makeCurveDynamic(generatedCurve)

        # Create spline IK handle from a base joint, an end joint, and a curve.
        splineIK = cmds.ikHandle(sj=joints[0], ee=joints[-1], sol='ikSplineSolver', c=dynamicCurveObjects[0], ccv=False, p=2, w=.5)

        # Create control curve.
        controlCurve = ao.createControlCurve(jointHierarchy)

        # Parent constrain control curve to follicle curve.
        cmds.parentConstraint(controlCurve, generatedCurve, mo=True)

        # Create auto overlap expression.
        ao.createAutoOverlapExpression(controlCurve, dynamicCurveObjects[1], dynamicCurveObjects[2])

        # Group all objects created by makeCurvesDynamic command.
        dynamicGrp = cmds.group(dynamicCurveObjects, n='dynamicCurve_' + controlCurve + '_grp' )
        cmds.parent(generatedCurve, dynamicGrp)
        cmds.parent(splineIK[0], dynamicGrp)

        # Hide any unused nodes from view port.
        unusedObjects = cmds.listRelatives( dynamicGrp, allDescendents=True )
        for objects in unusedObjects:
            cmds.setAttr((objects + '.visibility'), 0)

        # Return group containing all needed objects to make curve dynamic.
        return dynamicGrp
    else:
        cmds.confirmDialog( title='Please select joint.', message='Please make sure to select a joint with at least one child joint.' )
        raise RuntimeError("Selection was not a joint with at least one child joint.")

#####################################################################################################
##                                 We're going to begin our script here.                           ##
## Let's leave this part of the script out of the class. We can input a joint chain in other ways. ##
#####################################################################################################

#  Select the joint hierarchy from the base joint.
joints = cmds.ls(dag=1, ap=1, sl=1, type="joint")

# If the joint name is layered with '|', stop the script and alert the user.
for j in joints[0]:
    if j == '|':
        cmds.confirmDialog( title='Please rename joint.', message=('Joint "' + joints[0] + '" has | characters dividing the name. Please rename the joint.') )
        raise RuntimeError("Joint cannot have dividers in name.")


#  Create automatic overlap rig.
createAutoOverlapChain(joints)
You should now see that your joint has been completely made dynamic in one button click! You can also run this script on a second joint chain if you want. You can run this on as many chains as you want. The script is completely data driven now and makes completely unique nodes on every run so it can now be scalable.
I hope that this tutorial proved useful to you. Any feedback is highly appreciated! I'd like to be able to make more technical tutorials like this one teaching you not only how to do fun things in Maya but also how to script it.
nice tut
ReplyDeleteThank you so much. Look forward to more like this
ReplyDeleteThank you very much.
ReplyDeleteAs I am new to Python, I found this tutorial was extremely informative and easy to follow.
Thanks a lott for this wonderful tutorial
ReplyDeleteI have 1 Query how to create the same setup when multiple controls are used along with Fk joint Chain setup
Thanks, the nucleus node was making me crazy. Your update for Maya 2014 saved my day :)
ReplyDeleteThank you for this Barak. Very useful and incredibly well explained. I just have one challenge with it. When the animation curves that drive the control comes to a complete stop the dynamics also stop dead with continuing their follow through (even though the timeline is still playing). I see that as long as I keep the control moving, even a little bit, the dynamics will settle. But is there a setting that will work around this? You can see where it's getting used at TheWrongRock.com
ReplyDeleteGreat post and wanna see more from you. Keep posting for all of us. I like tips about Electric Rig and relevant products.
ReplyDelete